 Alarm Manager Extension
with
 Notification or
 Autostart

See the App Inventor Extensions document about how to use an App Inventor Extension.
For questions about this extension or bug reports please start a new thread in the
App Inventor community. Thank you.
For feature requests please contact me by email.
To be a sponsor of a new method already is possible starting from only 10 USD! With your contribution you will help the complete App Inventor community. Thank you.
Description
Alarm Manager Extension to send a notification or autostart the app at a given time even above the lockscreen
or at boot time only once or repeated by an interval.
You can define a start text, which will be passed to your app in method 'get plain start text' and trigger some action after your app is started.
Also of course works if your app is not running. The defined alarms will be reinitialized after rebooting the device.
You also can define several alarms, just use a different id for each alarm. Starting from version 8 you can execute almost any logic in the background (no user interface components)
after an alarm occurred and even define new alarms in the background, Please be aware, that there is no user interface available in the background.
Minimum API level is 21 (Android 5).
Required permissions:
android.permission.RECEIVE_BOOT_COMPLETED, android.permission.FOREGROUND_SERVICE,
android.permission.SYSTEM_ALERT_WINDOW (added in version 5 to open apps above other apps),
android.permission.POST_NOTIFICATIONS (added in version 7 to be able to receive notifications for newer devices),
android.permission.SCHEDULE_EXACT_ALARM (you can decide if you want to use exact alarms or not),
android.permission.DISABLE_KEYGUARD, android.permission.WAKE_LOCK, android.permission.USE_FULL_SCREEN_INTENT (addeed in version 10 to be able to open app above the lockscreen)
Kodular Restrictions
- The block get plain start text can't be used,
see also this Kodular error report as of Sept 30th 2021
Yes, the error has been reported more than 2 years ago and up to now they did not fix it. Also there are countless errors more in their system. Kodular is in the process of migrating into App Inventor.
Decide yourself, if you like to use Kodular under these circumstances...
See also my contribution here.
It would be wise to start your project in App Inventor and avoid the migration chaos.
- I will provide support for the OnReceive event handler only in MIT App Inventor. This feature is not tested in Kodular. Use it in Kodular at your own risk.
Properties for functionality


Reference screen for Itoo where the procedure 'OnReceive' exists. If no property is set, the extension will take "Screen1" as the reference by default.
OnReceive has the arguments title, text and startText.

Note: The OnReceive event handler also will be called if the app is in the foreground!

DEPRECATED. Property autostart has been replaced by property startmode. Autostart = false has been migrated to startMode = 1 (Only notification) and autostart = true to startmode = 3 (Start Always).

StartMode for alarm time.
Possible values are: 1, 2, 3 or 4. (1 = Only notification, 2 = Start Above Lock Screen or Notification, 3 = Start Always, 4 = Only Background Processing).
Default value is 2.
- Only Notification
Display a notification. After clicking the notification, the app will be started and screen "LockScreen" will be opened. In case that screen does not exist, Screen1 will be opened.
- Start Above Lock Screen or Notification
If the device is locked, the screen called "LockScreen" of the app will be opened above the lockscreen of the device! After closing the app, the device still will be locked.
If the device is unlocked, display a notification. After clicking the notification, the app will be started and screen "LockScreen" will be opened.
This is the recommended start mode to not disturb the user while using other apps, see also
here.
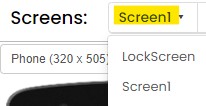
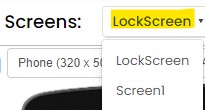
Make sure to have a screen called "LockScreen" in your app. It is not possible to open another screen above the lockscreen.
- Start Always
The app will always start and open the screen called "LockScreen" no matter the state of the device. This might be annoying if the user is in a phone call or using another app.
For this mode, additionally the permission "Appear On Top" is required.
Make sure to have a screen called "LockScreen" in your app. It is not possible to open another screen above the lockscreen.
- Only Backgrouund Processing
Do some background processing at a given time without showing a notification.
Note: For option 1 (Only notification): For newer Android versions you need Post Notifications permission.
See methods HasPostNotificationsPermission and AskForPostNotificationsPermission.
Note: For options 2 (Start Above Lock Screen or Notification) or 3 (Start Always):
Displaying an app above the lockscreen (also known as full screen intent) requires for Android 14+ devices additionally full screen intent permission.
After each app update this permission needs to be refreshed again!
Its use is restricted:
For apps targeting Android 14 (API level 34) or higher, apps that are allowed to use this permission are limited to those that provide calling and alarms only.
You can use method HasFullScreenIntentPermission to check if your app has the permission; if not or if your app has not been approved for default enabling use of full screen intents
you can use method AskForFullScreenIntentPermission to launch the settings page where users can grant the permission.
Note: For option 3 (Start Always): additionally the user needs to grant "Appear On Top" permission.
See methods HasAppearOnTopPermission and OpenAppearOnTopSettings. So while the user is using another app,
at a given time your app will get priority and will appear on top of the other currently running app.
Note: For option 4 (Only Background Processing): no permission is necessary.
You can think about asking for ScheduleExactAlarm permission in case this is required for your use case.
Note: To be able to autostart the app at a given time make sure to close the app using the close application block, else the app will not start, because it is already running.
Note: Use the new feature to open the app above the lockscreen for new apps only, because the notification channel needed an update to be able to use full screen intents.

Returns/Specifies whether app should schedule exact alarms. Default value is False.
Note: Google recommends to use exact alarms wisely to reduce battery consumption.
See also Use cases that might not require exact alarms.
If you decide to use exact alarms, then the user needs to grant the SCHEDULE_EXACT_ALARM permission, see method AskForScheduleExactAlarmPermission below.
Properties for Notification style

Returns SmallIcon for notification. Recommended size is 96x96.

Sets SmallIcon for notification. Recommended size is 96x96.
Note: this feature is available starting rom Android 6 (API Level 23). For older devices this setting will be ignored.
The small icon must be in png format and have a transparent background.

Returns LargeIcon for notification. Recommended size is 256x256.

Sets LargeIcon for notification. Recommended size is 256x256.
Note: this feature is available starting rom Android 6 (API Level 23). For older devices the application icon will be used as large icon.

Returns BigText for notification

Sets BigText for notification
Note: you can only use bigPicture or bigText. If you specify both, then only bigText will be displayed.

Returns BigPicture for notification. Minimum: 512x256, Balanced: 1024x512, Maximum: 2048x1024.

Sets BigPicture for notification. Minimum: 512x256, Balanced: 1024x512, Maximum: 2048x1024.
Note: you can only use bigPicture or bigText. If you specify both, then only bigText will be displayed.

Returns the notification color, i.e. the color as an alpha-red-green-blue integer.

Specifies the notification color.
Note: you can use any integer color code or the color blocks of App Inventor.
In the example alarmmanager app I used a simplified version of Italo's color picker example,
see also the example project "StatusBarColor blocks" in the tools extension documentation.

Returns/Specifies the custom Notification sound file stored in the assets of the app. The sound file will be copied into the /Ringtones folder of your device and used from there.
Note: if you want to use a custom notification sound file for your app, you have to set it before using the Start or StartRepeated method.
The extension uses only one notification channel to keep the extension as simple as possible. The sound file later can't be changed anymore, because this is set in the notification channel directly.
Note: this feature is available starting from Android 8 (API Level 26). For older devices this setting will be ignored.

Button1Text for notification
You can define the text of button1, which will be displayed in the notification and configure the event handler OnReceiveButtonClick
to trigger some functionality after the button has been clicked without opening the app.

Button2Text for notification
You can define the text of another button2, which will be displayed in the notification and configure the event handler OnReceiveButtonClick
to trigger some functionality after the button has been clicked without opening the app.
Screenshots
Note: These are screenshots taken from a Samsung Galaxy A51 device running Android 10. Depending on the Android version you will get slightly other results.
Methods for Permissions

Returns true, if app is able to schedule exact alarms.
Note: Apps can schedule exact alarms only if they have SCHEDULE_EXACT_ALARM permission or they are on the device's power-save exemption list.

Ask for Schedule Exact Alarm permission. Required starting from SDK 33 to schedule exact alarms.
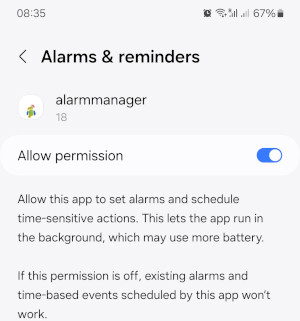

Returns true, if post notifications permission has been granted, else false. This permission is available starting from SDK 33.

Ask for Post Notifications permission. Required starting from SDK 33.


Returns true, if app has full screen intent permission, else false. This method is available starting from SDK 34.


Ask for Full Screen Intent permission. Required starting from SDK 34 for apps that did not complete the Google Play declaration
or have not been approved for default enabling use of full screen intents. This method is available starting from SDK 34.

Open Notification Settings (deprecated).
In version 8 method AskForNotificationsPermission has been added. You might want to use the new nethod instead of OpenNotificationsSettings.

If user likes to autostart the app, special permission is required, Using this method, you can check, if the permission has been granted.

Open Appear On Top Settings to enable Autostart for app.
Until Android 10 the user can enable the Appear On Top setting directly after using the Open Appear On Top Settings method.

Starting from Android 11 you first have to select your app ...

... before you can enable the Appear On Top setting.

Methods for functionality

This method is for alarms which only should fire once, but starting from Version 3 also for long term intervals.
Start an alarm at a given date/time (instant). In case the time already has passed,
the alarm will start asap. Define the title, text and start text of the notification.
Interval can be one of the following values: 'ONCE', 'WEEK', 'MONTH', 'YEAR'.
The start text is the value which will be passed to your app in method 'get plain start text'. Use your own id (integer value).
If you use the same id again, then the previously defined alarm, which already uses that id will be overwritten..
Note: Starting from Version 9 you can choose if you want to set exact or inexact alarms. Set property ScheduleExactAlarms accordingly.
Note: You might want to check, if your app has post notifications permission using the new method HasPostNotificationsPermission.
Note: You will have to build the app to be able to test this method.
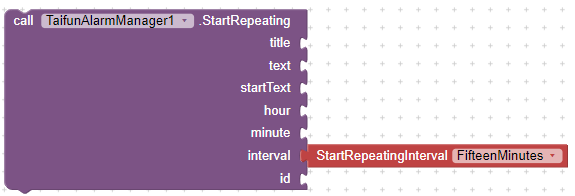
Start a repeating alarm at a given hour and minute (short term intervals). Define the title, text and start text of the notification.
Interval can be one of the following values: 'FIFTEEN_MINUTES', 'HALF_HOUR', 'HOUR', 'HALF_DAY', 'DAY'
The start text is the value which will be passed to your app in parameter 'get plain start text'. Use your own id (integer value).
If you use the same id again, then the previously defined alarm, which already uses that id will be overwritten.
Note: Starting from Version 9 you can choose if you want to set exact or inexact alarms. Set property ScheduleExactAlarms accordingly.
Note: You might want to check, if your app has post notifications permission using the new method HasPostNotificationsPermission.
Note: You will have to build the app to be able to test this method.
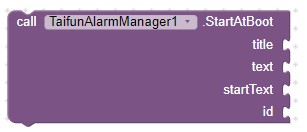
Start an alarm at boot time.
The start text is the value which will be passed to your app in method 'get plain start text'. Use your own id (integer value).
If you use the same id again, then the previously defined alarm, which already uses that id will be overwritten."
Note: You will have to build the app to be able to test this method.

Return a list of all alarm Ids.

Retrieve the alarm in JSON format stored under the given id. If there's no such id, then return empty string.

Get all Alarms in JSON format.

Cancel an alarm using the id you previously used to start the alarm.
Events

Event returning success or failure after starting an alarm.

Event returning success or failure after canceling an alarm.

Event indicating that an alarm occurred. Event will fire only if the app is up and running, else depending on the startMode a notification will be displayed or the app will open screen LockScreen.
For multiple screen apps this happens only for those screens, the extension is being used or has been dragged to the working area.
Example App "Simple Notification" to get a daily notification at 9am
The example uses inexact alarm times. Google recommends to use exact alarms wisely to reduce battery consumption. To set exact alarm times see property ScheduleExactAlarm.
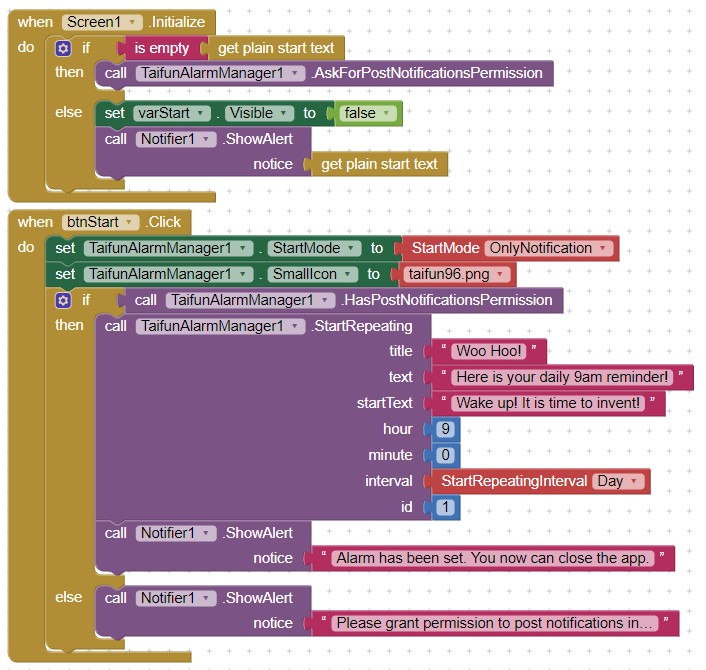

Screenshots:
Example App "Alarm Manager with Notification Test"


Screenshots:
 Example App "Lockscreen"
This is a a test app to demonstrate the open above lockscreen feature of the alarmmanager extension.
Instructions:
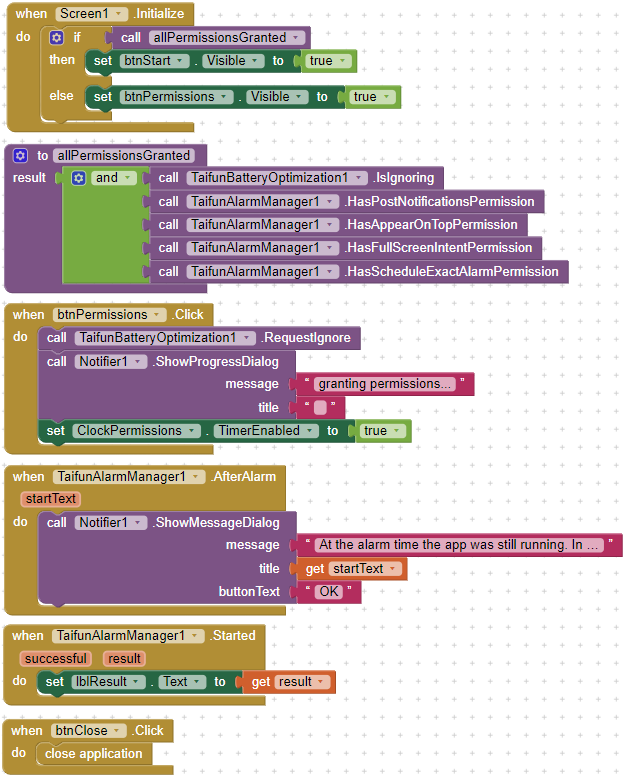
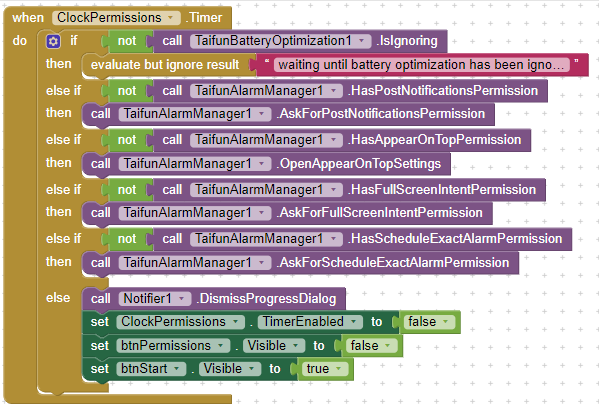
1) First grant the necessary permissions. After that, the Start button will appear.
2) Click "Start".
3) Close the app and lock the device.
4) After 1 minute the app will start above the lockscreen and open screen "LockScreen".
Note; In the example app additionally I'm using the Ignore Battery Optimization extension.
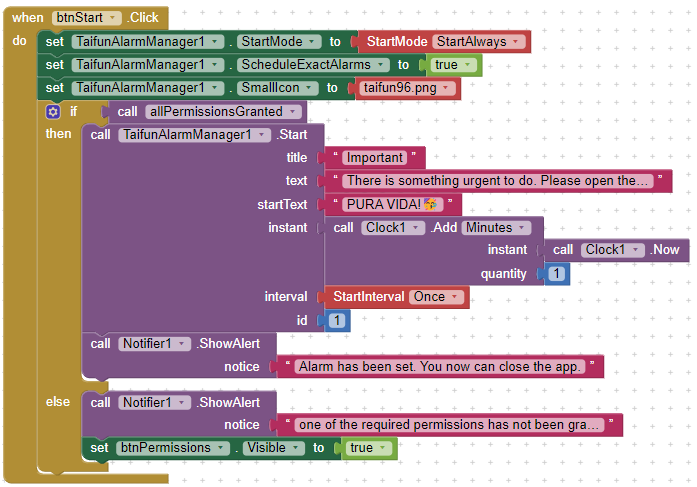
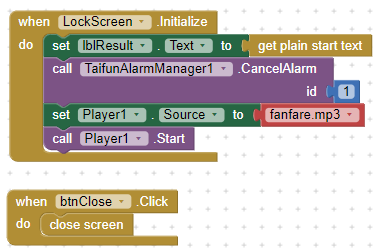
Screenshots:
Itoo integration
Itoo
is a powerful framework to execute blocks in the background. Starting from version 8 the alarmmanager extension uses the
itoox-wrapper library
and provides the new OnReceive event handler (which looks like a procedure). By default the event handler is located in Screen1.
But you can set the property ReferenceScreen (see documentation below) to use the event hanlder on a different screen.
The background event handler will be called from Itoo from the background after an alarm occurred.
You will have to create the procedure using the name OnReceive.
Also that procedure must have 3 arguments, else it will not work. Note: This background event handler also will be called if the app is in the foreground.

Now we can execute almost any logic in the background (no user interface components) after an alarm occurred
and even define new alarms in the background. Please be aware, that there is no user interface available in the background.

This event handler can be configured to trigger some functionality without opening the app.
The background event handler will be called from Itoo from the background after a button has been clicked in the notification.
You will have to create the procedure using the name OnReceiveButtonClick.
Also that procedure must have 1 argument, else it will not work. The argument action will contain the text Button1 or Button2 depending on the button, which has been clicked.
- You should already have some experience in App Inventor and understand the basics. If you are new, then first
learn App Inventor and come back later for these advances features. Alternatively you can contact me by email to get personal support for a small fee.
As beginner you already can use the alarmmanager extension without the OnReceive or OnReceiveButtonClick event handlers!
- You are familiar with the Do it debugging functionality of App Inventor.
- You are familiar with using Logcat.
To find possible errors of your blocks in the background, let me suggest to filter the logcat output for the tags TaifunAlarmManager, Notifier, ItooCreator and System.err.
Guidelines for using Itoo
- First get your background functionality running in the foreground. Like this, you can find errors much easier. And as soon as you got it working in the foreground, then test it in the background.
- Read the complete Itoo to leaarn how Itoo works and try the example projects,
See also the battery checker tutorial and
notification listener and itoo tutorial.
- Do not use global variables while in the background, use local variables instead
- Do not use any user-visible or UI components in the background
- In the background, use the Itoo StoreProperty/FetchProperty methods rather than TinyDB. TinyDB relies on SharedPreferences which will not ensure data synchronization across background processes.
Example use cases
- Run a function when the alarm is activated and also set the next alarm without opening the screen or disrupting the user experience
(requested by Tammi_Allen)
- Send a text message after an alarm occurred
- Do something regularly in the background or after booting the device.
- Get daily prayer notifications (prayer times change from day to day)
(requested by Chechnya_360)
Example blocks about how to use the alarmmanager extension together with Itoo
Test
Tested successfully on several devices starting from Android 5 up to Android 14.
Questions and Answers
Q1: Woud it be possible to add a feature to the extension to restart my app at a defined date and time in the future?
A:
This is now possible starting with version 5. However Google restricts this feature like this (taken from here): Android 10 (API level 29) and higher place restrictions on when apps can start
activities when the app is running in the background. These restrictions help minimize interruptions for the user and keep the user more in control of what's shown on their screen.
In nearly all cases, apps that are in the background should display time-sensitive notifications to provide urgent information to the user instead of directly starting an activity.
Also starting from Android 10 the app must have been granted the SYSTEM_ALERT_WINDOW permission by the user to be able to restart itself from the background. And in
Android 11 this has been even restricted further.
 Starting with version 10 the extension is also able to start the app above the lockscreen in case the device is locked.
Q2: I'm using a Xiaomi device and the alarm does not work anymore after rebooting the device. What can I do?
A: After rebooting the device, the Boot Service must reconfigure the alarms. However on Xiaomi devices, Auto Start is disabled by default for all applications.
See here how to enable it for your app.
See also https://dontkillmyapp.com/xiaomi
Q3: How to get an instant of the 25th of the current month?
A: See my answer here.
Q4: How to initiate a specific screen after clicking on push notification?
A: You will have to use the Screen.Initialize event like this
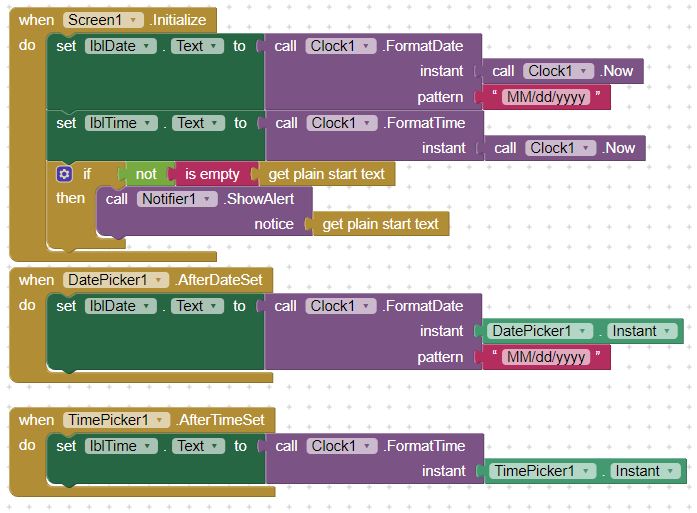
if not is empty get plain start text
then open another screen "your screen name"
You can find the not block in the logic drawer, the is empty block in the text drawer and the get plain start text block in the controls drawer.
Q5: I am trying to send a text message using AfterAlarm method when app is on the forefront sms goes but it does not go when app is in the background or after phone restarts
A: This is now possible starting from Version 8 of the extension.
Q6: I would like to start my app regularly to do something without user interaction. Is this possible using this extension?
A:  Yes you can. Starting from Version 10 of the extension
it is possible to start your app above the lockscreen (in case the device is locked) or above other applications in case the device is in use.
Also depending on the use case rather than starting the app what about executing some functionality in the background after an alarm occurred?
See chapter itoo integration above.
Q7: Method StartAtBoot does not work for me. What I'm doing wrong?
A: Which device and Android version are you using for your tests? Xiaomi? Try to disable battery optimization, see also
See also dontkillmyapp.com. For Redmi: App Settings - Battery Optimisations - Do not optimise battery. You may also do this
App Settings - AutoStart - Enable Auto Start.
Q8: I'm using StartMode = Only Notification. After uploading my app to Google Play I get the following message displayed:
Issue found: Permission use is not directly related to your app's core purpose. We found that your app is not compliant with
how USE_FULL_SCREEN_INTENT permmission is allowed to be used. Specifically, the use of the permission is not directly related to the core purpose of the app.
A: To avoid this Google restriction I now additionally provide a LITE version of the extension for those who only like to use StartMode = Only Notification.
Test the functionality of the Alarm Manager with Notification extension
3 test apps are available in Google Play. You can test the extension following these steps
- Follow the opt-in URL for the alarmmanager example app
to get access to the app and to be able to download it to your device. Here you can test all the notification features.
 Follow the opt-in URL for the Lockscreen example app
to get access to the app and to be able to download it to your device.
Follow the opt-in URL for the Lockscreen example app
to get access to the app and to be able to download it to your device.- Start testing.
Buy the Alarm Manager extension for  App Inventor

 Version 11 (currently in BETA): new start mode 'Only Background processing" added to do some background processing at a given time without showing a notification.


 ,
,
 icons found at